Written for the September 2026 version of Trichroma Lab. Some screens have changed since.
Trichromatic film scanning · 665 / 525 / 455 nm
The manual
Three exposures in, a finished scan out. What each step asks
for, and why it asks for it.
TRICHROMA LAB · for the desktop app, macOS 14+ and Windows 10 22H2+
SP‑3000 and Frontier are trademarks of FUJIFILM. Trichroma Lab is not
affiliated with, sponsored, or endorsed by FUJIFILM.
Contents
What is in here
The chapters follow the order the app works in, so this can sit
open beside it. Every number here is one the app measures, and where a
threshold has a reason the reason is given — because that is the part that
tells you what to do when a roll does not behave.
Trichroma Lab · the manual
Chapter one
What this is
A colour negative is three dye layers. Trichroma Lab measures
them one at a time, under three narrow bands of light, and prints the result
through a pipeline of the kind a film lab runs.
Photograph a negative under white light and your sensor measures those dyes
through its own red, green and blue filters. Those filters are wide and they
overlap: the camera's red channel sees some of what the magenta dye is
doing, the green channel sees some of the cyan. Each layer's measurement is
contaminated by the other two, and the orange mask has to be guessed away
afterwards.
Shoot the same frame three times instead, once under each narrow band, and
every exposure measures one dye layer and almost nothing else.
665 nm525 nm455 nm
Three exposures per frame go in and one finished positive comes out.
Between them the app measures the light, measures the film base, registers
the three channels onto each other, and grades the roll.
White light is supported too
One exposure per frame under a white lamp is a supported way in. It is
harder, not impossible: under white light the sensor's own filters are half
the instrument, so that mode is calibrated for a named station rather than
offered blind. Everything in this manual applies to both unless a section
says otherwise.
What the app does not do
It does not decode your raws into a picture and then filter it. It does not
guess your film stock from the image. It does not adjust per frame what it
can measure once per roll. And it never moves or changes the raws you import:
a roll keeps its own copy of the sensor data it needs, so once PROCESS has
finished the raws can go to your archive.
1 · What this is
Chapter two
The rig
A camera on a copy stand, a film holder, and a lamp that can
put out three narrow bands one at a time. Once that is built and measured,
it stays measured.
The lamp
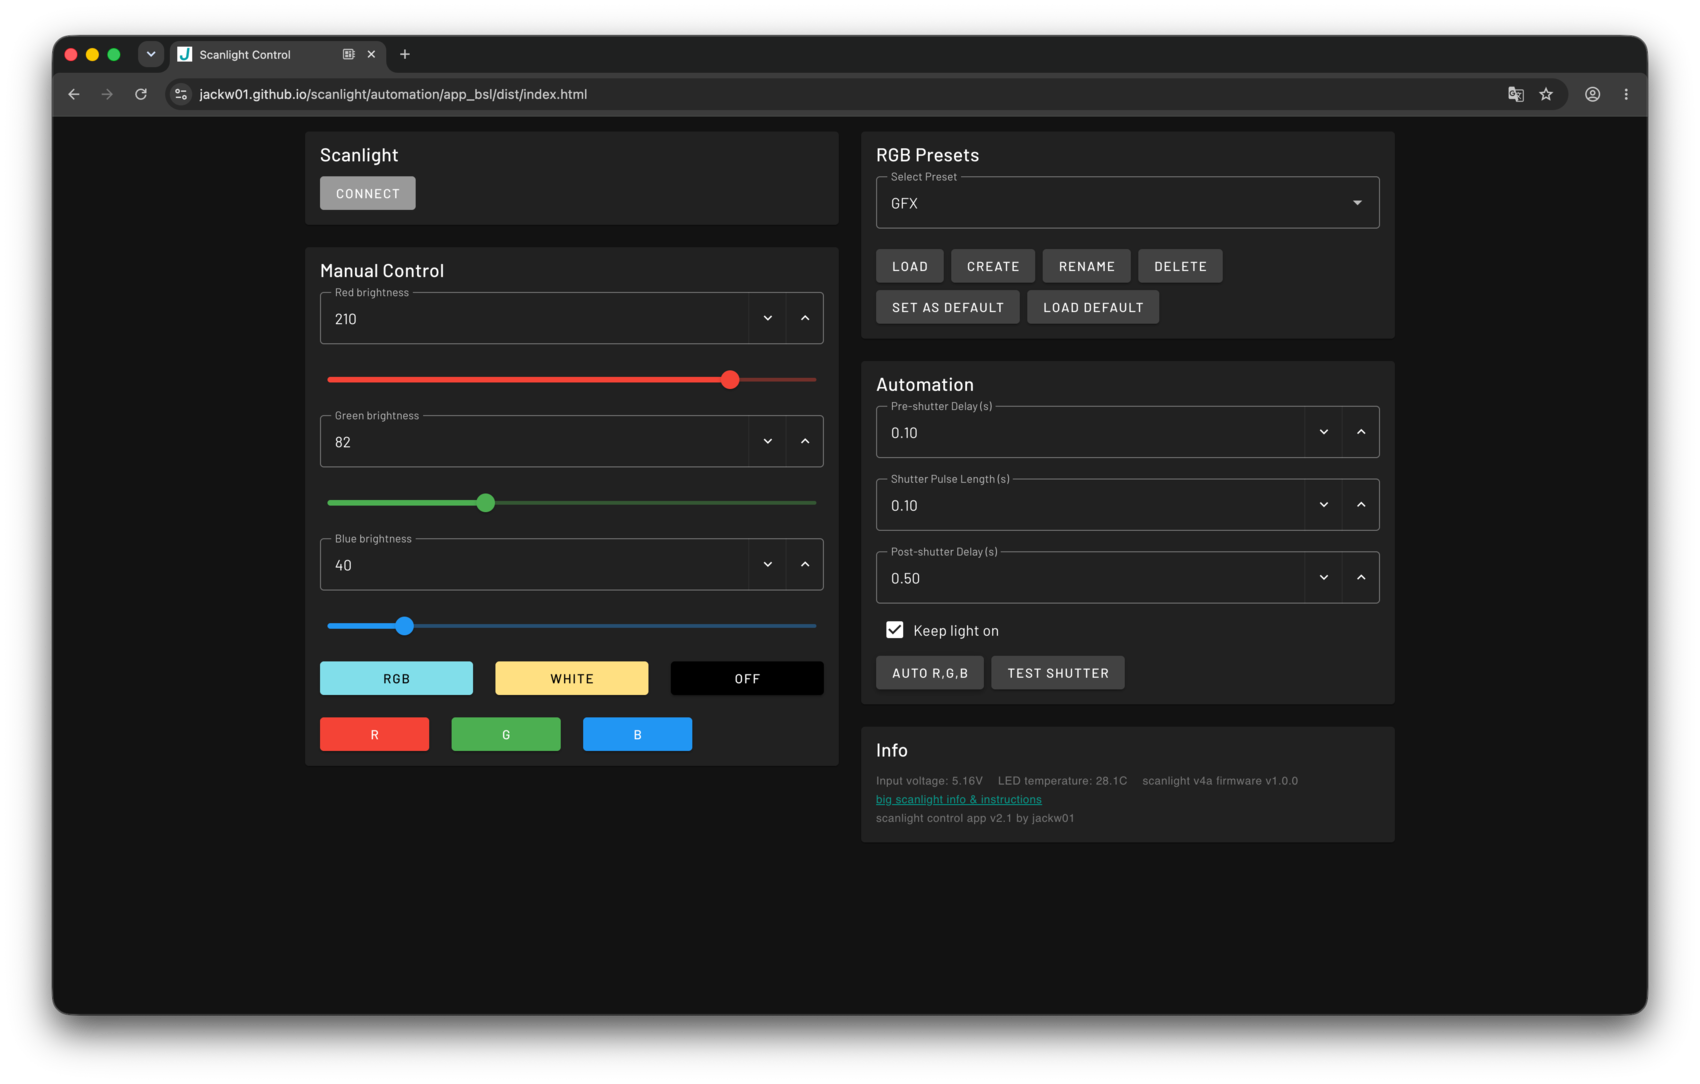
The rig this manual is written against uses a Scanlight v4 — an
open-source RGB scanning light by jackw01, driven from a browser-based
control app. It is not our hardware and we do not sell it. It is named here
because it is what the measurements in this manual were taken on, and
because its control app is where the numbers in the next chapter are typed.
Any lamp that can produce three sufficiently narrow bands will do. What the
app needs from it is not a brand: it is that each band is narrow, that the
lamp holds still while a roll is shot, and that you can write down where the
knob was.
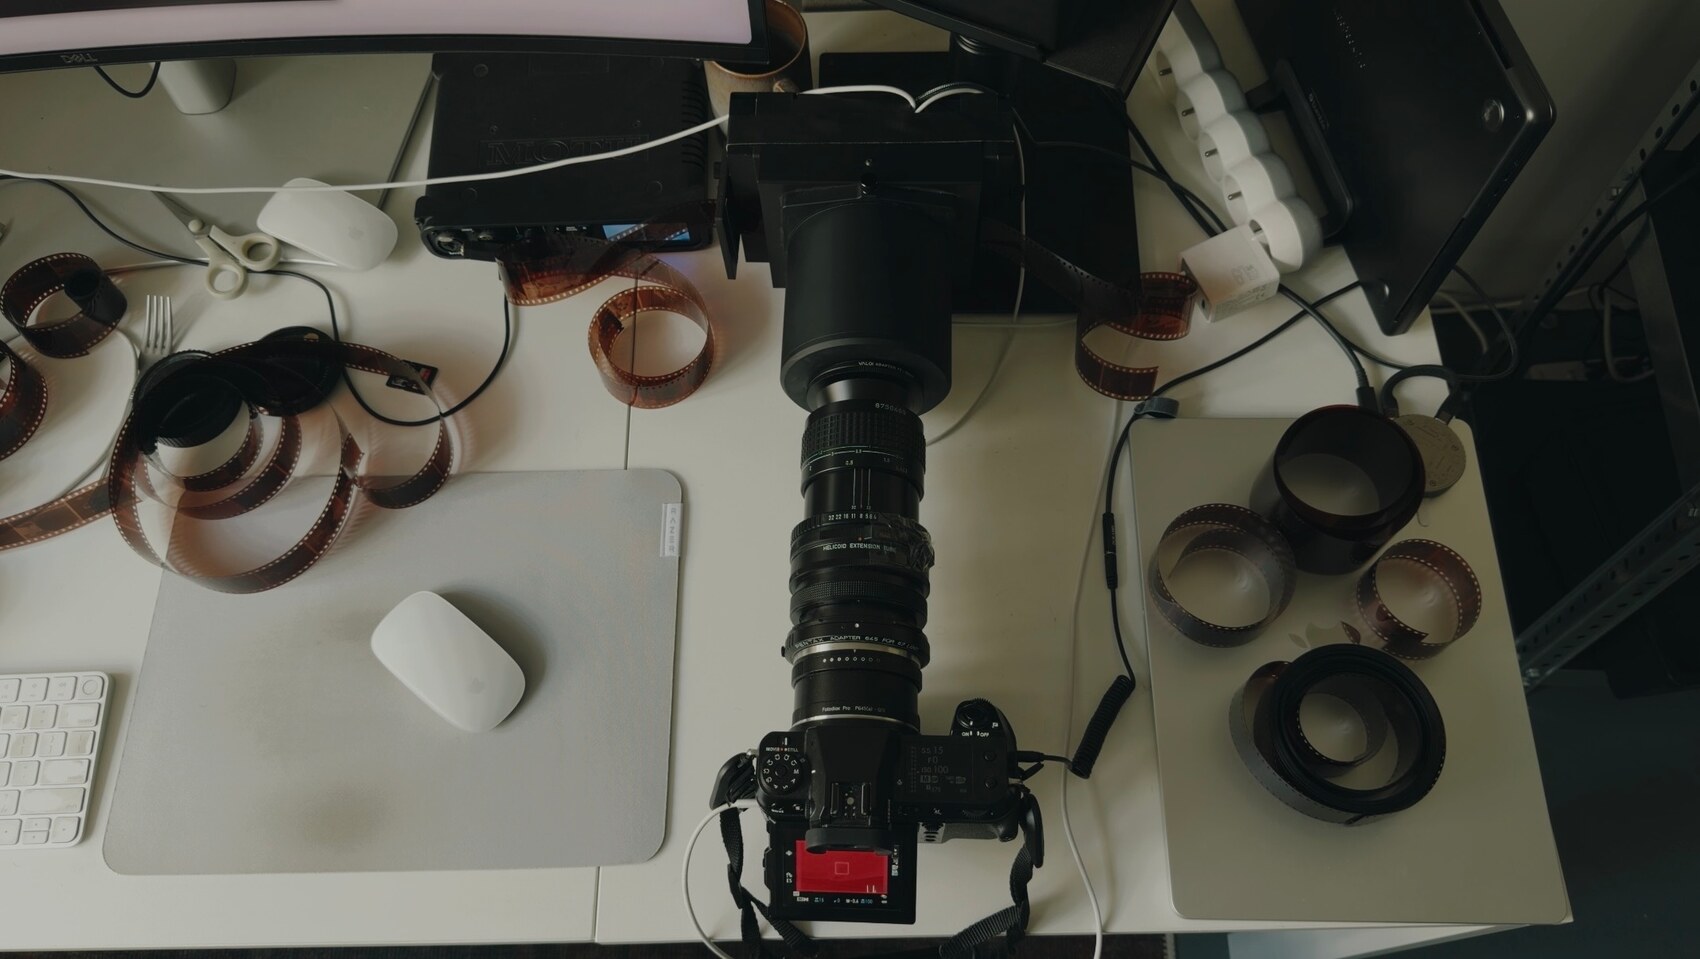
2.1 — the bench from above. The camera looks straight down
the axis into the holder, with the film running through the gate beneath
it.
The camera and the stand
Shoot raw. Fix the camera and the film in place and do not move either
between the three exposures — the app corrects small residual drift, and
does not stand in for a tripod. Turn in-body stabilisation off as well: on
a stand it has nothing to steady, and it can move the sensor between
exposures. And shoot single frames rather than a burst: some cameras
write fewer bits per photosite in continuous drive. On a Nikon, choose
lossless compressed NEF: the High Efficiency formats cannot be read.
2 · The rig
One shutter, one ISO
Manual exposure throughout, and the same shutter and ISO across the three
bands of any one set. This matters more than it looks. A calibration split
across two shutter speeds carries about 90 counts
of error into every density on the roll while looking perfectly ordinary,
which is why the app refuses to save one.
Aperture is not compared
Only shutter and ISO are checked. Aperture is deliberately left out
because a manual lens reports f/1.0 whatever it
is actually set to — a number the app cannot trust is worse than no
number.
The holder
Whatever holds the film flat, as long as two things are true when you look
through the camera: the frame and the clear film around it are both visible,
and the black holder can be left outside the box you will draw in chapter
eight.
That clear film around the frame — the rebate — is not spare margin. It is
unexposed film base, and it is where the roll's own base density is read.
Chapter eight is about protecting it.
What gets measured once
Measured
How often
Kept in
The lamp's three flats
Once per rig, again when the lamp, lens or aperture changes
rigs.json
The lamp settings you typed
With the flats
rigs.json
The base area box
Once per holder
rigs.json
The film base
Every roll
the roll file
Channel registration
Every frame
the roll file
The first three are the rig. The last two belong to the film and are
measured again for every roll you shoot, because they are properties of the
film and not of the bench.
2 · The rig
Chapter three
Setting the lamp
Take the film out. Point the camera at the empty gate. Set each
band so the sensor is filled to between 75 and 90 % of its range, with
nothing at the ceiling — then write the three numbers down.
This is the one part of the process that happens outside the app, in the
lamp's own control software. What you are looking for is not a pretty
picture: it is three exposures of nothing at all, each one as bright as it
can be without touching the top.
3.1 — red, green and blue set independently. The three
numbers will differ by a lot, and that is expected: on one measured rig the
three colours ran at 190, 485 and 937 counts per unit
of setting — five times apart, over entirely different working spans.
3 · Setting the lamp
Why 75 to 90 %
Below 75 %, the flat wastes well capacity, and with it the signal-to-noise
of every density measured against it. The flat is a divisor: noise in it
becomes noise in every frame on the roll.
The top of the window is 90 % and not 100 %, and the gap is not caution —
it is drift. A lamp was measured moving 1.3 %
between two consecutive exposures at one setting, and a white lamp measured
falling 7.2 % across a single sitting with the
exposure unchanged. A flat set at 96 % is not clipped today and is clipped
next week.
What the number actually is
The percentage the app shows is the 99.9th percentile of the
exposure, not its brightest pixel. The last tenth of a percent is hot
photosites and dust, which say nothing about the lamp. That is also why a
few pixels at the top are reported as
“the sensor, not the light” rather than as clipping.
3 · Setting the lamp
Working towards it
You will not hit the window first try, and you are not meant to. Type a
setting, shoot the gate, drop the file into the app, and it will tell you
where that setting landed and suggest the next one. Two or three rounds is
normal.
The app suggests rather than calculates because no formula survives contact
with somebody else's hardware — the three channels of a real lamp do not
share a response, a span, or a starting point. It learns yours from the
settings you actually tried.
Write the numbers down
The lamp setting is the one thing in the whole measurement that cannot be
recovered later. The level comes off the pixels, the exposure comes off the
file, the band is read out of the image — but where the knob was is only
ever knowledge from the room. Type it into the app so it is kept with
the calibration.
If you are using a white lamp
The window is different, and so is the instruction. One broad capture read
through the camera's colour filters cannot put all three channels
into 75–90 %, because green collects roughly twice what red and blue do.
Aiming a white exposure at that window teaches you to blow out your green.
For white there is one exposure and one rule: stay clear of the ceiling.
The app wants it under 92 % and not below
60 %, and says which way to move.
Automation
If your lamp's control app can fire the camera, use it. Three exposures
triggered in sequence with the light changing between them is three
identically framed exposures; three exposures triggered by hand is three
chances to nudge the stand. Keeping the light on between frames also avoids
warm-up drift inside a roll.
3 · Setting the lamp
Chapter four
Flats — the denominator
A density is a ratio. The flat is the bottom of it.
Every density in the scan is measured against the empty gate:
D = −log10 ( frame ÷ flat )
So the flat is not a nicety of the capture. It is the denominator of the
whole measurement, and a flat that is clipped at the top pulls every density
in that channel down without leaving a mark on the rendered picture.
Put the other way round: a roll with no flat does not have worse
densities. It has none — every number downstream is a fraction of the
sensor rather than of the light.
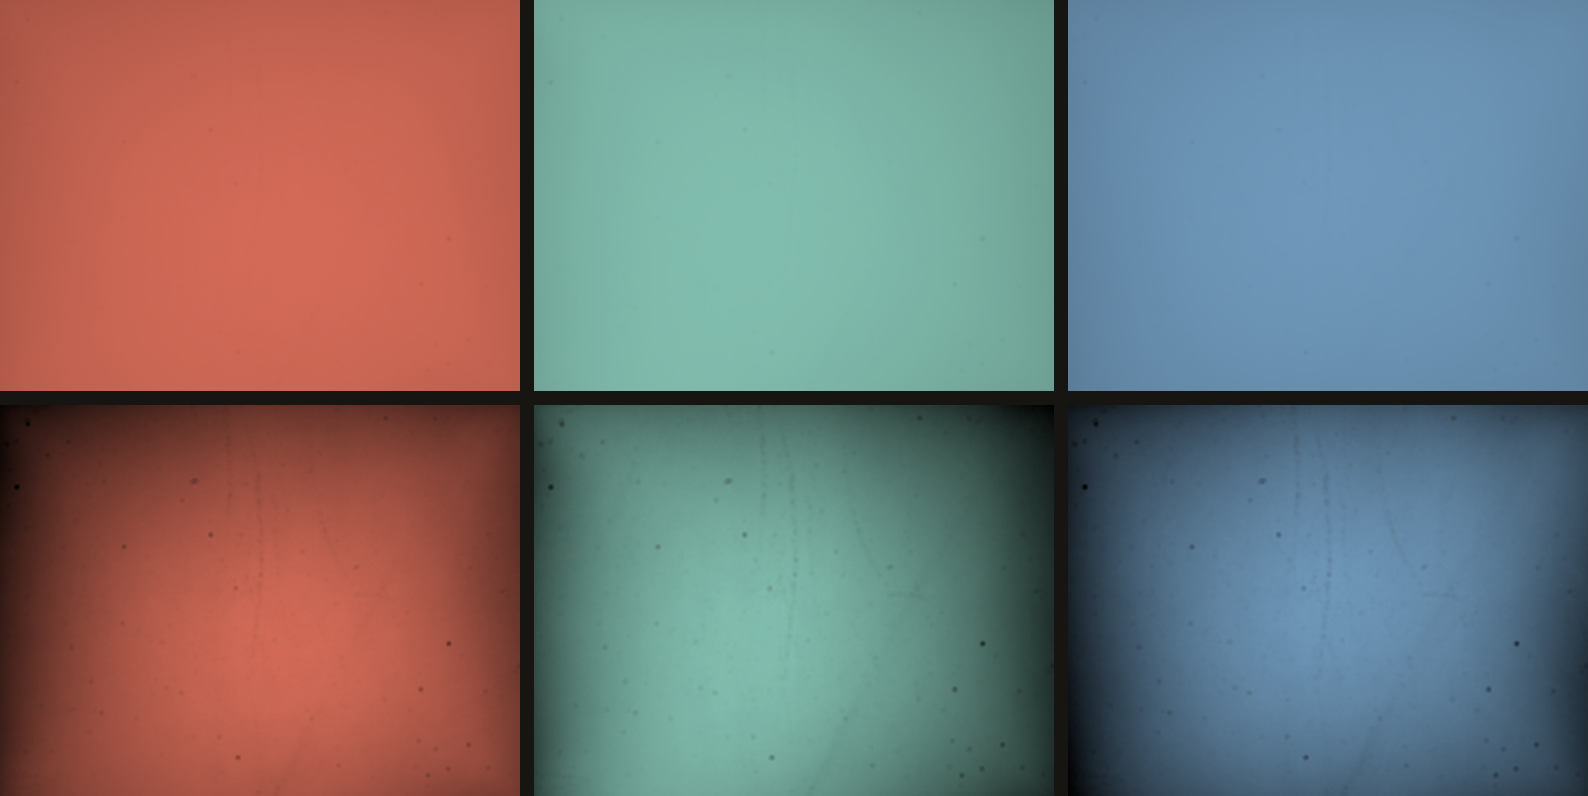
4.1 — three exposures of the empty gate, from a real
calibration. Top: each field on its own scale — what you are
photographing is nothing at all. Bottom: the same three stretched
between their own ends, which is the only way to see what is actually
there: the lamp and lens falling away towards the corners, and dust on the
light path. The app measures that falloff and divides it out of every
frame. The specks are too small for it to reach — those you clean.
Flats are taken out of the roll
Include the three bare-light exposures with the roll when you import, and
the app finds them and lifts them out. They are the light, not frames.
They come out before grouping, and that ordering is deliberate: three
bare-light exposures shot seconds apart are a perfect frame as far
as the grouper is concerned — same sequence, one per band. A set left in the
pile becomes a phantom frame that gets graded, counted and exported like any
other.
4 · Flats
If you have neither
The app will not stop you, but it will not pretend either. You can waive the
light, and then the roll is anchored on a film-stock table instead of on your
own measurement, its densities come out in synthetic units, and the save
button says so: process N frames · no light.
One bare-light frame anywhere in the roll retires the waiver by itself. The
app finds it.
The button changes rather than greying out
With no flat and no waiver, the button on the base-area sheet reads
calibrate… instead of next. A greyed-out control
would be the app refusing without saying what to do about it; this one
takes you to the fix.
4 · Flats
Chapter five
Calibrating the rig
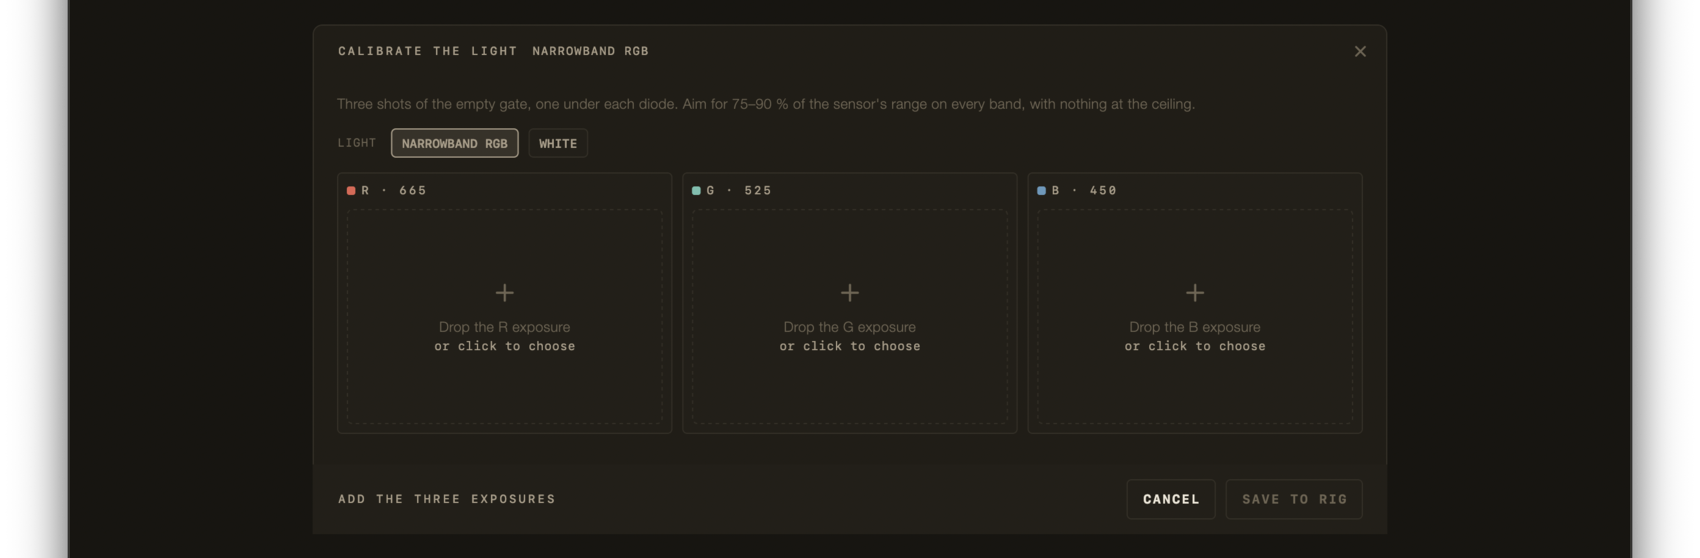
Three shots of the empty gate, one under each diode — the
denominator of the last chapter, measured and written down.
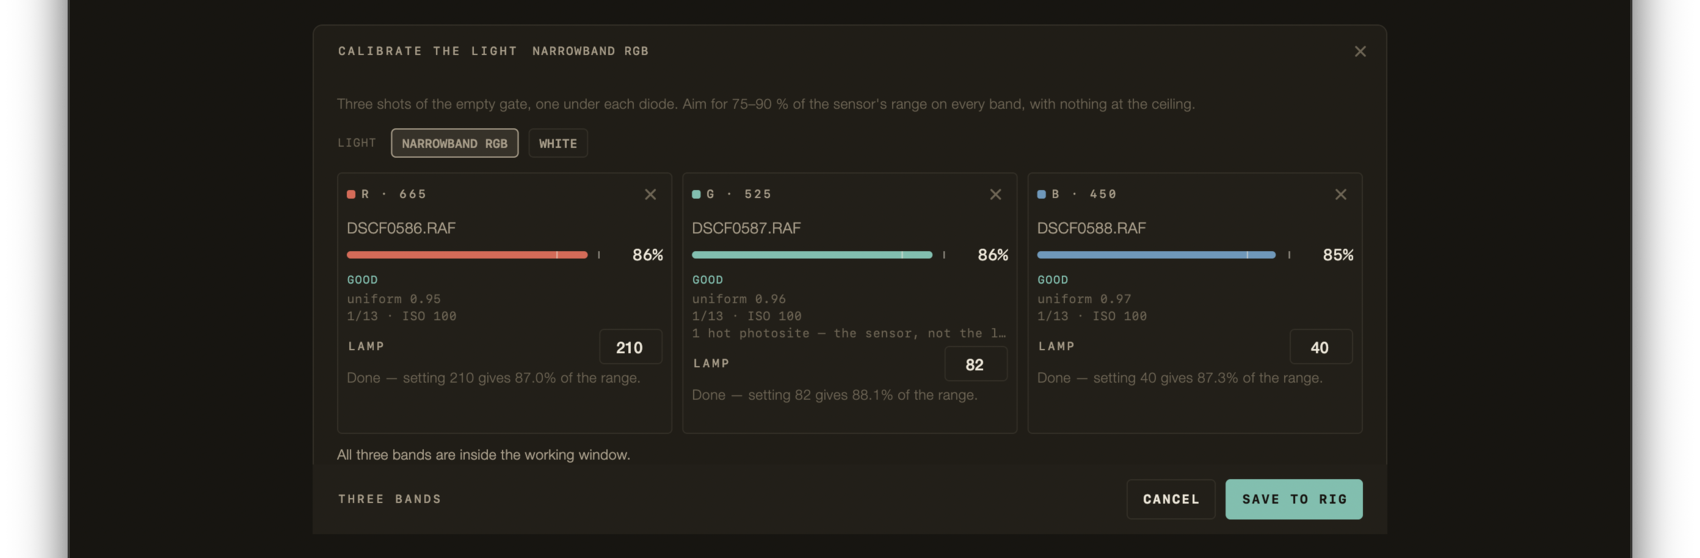
5.1 — three wells, one per band. Drop the exposures in any
order: the band is read out of the image, never from the file name.
Order does not matter, names do not matter
You cannot put the red exposure in the green well by mistake. The app
decides which band a file is by looking at it — the largest median names it —
and the reason is blunt: the file name is not evidence. It is typed
by hand and it has been wrong. A red exposure of the empty gate reads
something like 12474 / 1683 / 517 across the three
channels; nothing else looks like that.
5 · Calibrating the rig
What the sheet tells you
5.2 — three exposures read. Each well shows the level as a
percentage of the sensor's range, a verdict, the uniformity, the shutter and
ISO it was shot at, and the lamp setting you typed.
Six verdicts are possible. They are checked in this order, and each one says
what is wrong rather than just that something is:
Verdict
Means
Usable
NOT A FLAT
This looks like a frame with an image on it
no
UNREADABLE
Clipped past measuring — cut the light by about a third
no
CLIPPED
Photosites at the ceiling — cannot be divided by
no
TOO BRIGHT
Brighter than the window — back the light off
yes
TOO DARK
Dimmer than the window — raise the light
yes
GOOD
Inside the working window — freeze these settings
yes
Only the first three have to be shot again. The rest are advice.
5 · Calibrating the rig
Uniformity
Beside the level sits a second number — uniform 0.95 or
similar. It is the middle of the exposure divided by its brightest part, and
it is what tells a flat from a frame. A real flat reads around
0.92 to 0.94; a frame with
a picture on it reads 0.08 to
0.26. Anything under 0.70
is rejected as not a flat at all.
That check exists because the level alone would wave a frame through: the
brightest part of a frame is its rebate — bare film — which passes nearly as
much light as the empty gate. On level alone, a negative looks like a
perfectly reasonable flat.
Saving does not require GOOD
This surprises people, so it is worth stating plainly. The app will save a
calibration whose bands are outside the window. What it insists on is
different:
All three bands present
All three actually flats
All three shot at the same shutter and ISO
A dim flat is a true picture of a dim light, and refusing to record it would
leave the roll with no denominator at all. The screen says what is not ideal;
the gate refuses only what is not usable.
The line at the bottom of the sheet
It tells you which of these you are missing — “Still missing R and
B.”, “One of these is not a picture of the empty gate.”,
“These were not all shot on the same shutter and ISO.” — or, when
it is ready, either “All three bands are inside the working
window.” or “Usable, but not every band is inside the window
yet.”
Save to rig, or use for this roll
The same sheet does two different jobs, and which one it is doing is written
on its button.
Save to rig
Use for this roll
Opened from
the rig panel, settings, or the base-area gate
the flats well on the roll
Heading
calibrate the light
the flats for this roll
Written to
rigs.json
nothing — it stays with the roll
A roll's flats are a measurement of one session, and a session is not a
calibration — so they are never written to the rig. This distinction was once
a single button, and it re-calibrated the whole station from three exposures
shot beside one roll while leaving that roll with no flat at all.
5 · Calibrating the rig
Which flat a roll uses
Source
When it is used
Session — shot beside this roll
Whenever it exists. It is the only one that saw the same light the frames did.
Rig — from the calibration
The fallback. Right until the lamp, the lens or the aperture changes, and silently wrong afterwards.
Shooting flats with every roll costs three frames and removes an entire
class of silent error. It is the single cheapest habit in this whole
process.
Two lamps are kept apart
If you use both a narrowband lamp and a white one, the rig holds two
separate calibrations and the app always knows which is which. This is not
tidiness. A white roll divided by the narrowband flat reads three diodes
under a different lamp, and the base spacings it then reports are wrong in a
way nothing downstream can detect — measured at
0.48 where the film's own spacing is
0.22.
A calibration has a date on it
When the sheet opens on a calibration you saved earlier, it says so and
shows the date. A lamp drifts, so a screen that showed last year's
calibration as though it were current would be worse than one that showed
nothing. Drop new exposures onto a well to replace a band.
Remove from rig is styled as destructive
Because of the lamp settings. Everything else on that sheet can be
measured again from the files; the numbers you typed cannot.
Falloff
The flats carry more than a level. From them the app builds a map of how
your lamp and lens fall off towards the corners, and divides it out of every
measurement and every rendered frame. Without it, that falloff lands in the
film base as invented density — measured at
7–19 counts on this rig,
and 20 counts of green costs up to +2.11 dE.
It is all three bands or none: a partial correction would tilt the base's
red-to-blue balance, which is worse than no correction at all. There is no
per-image switch, because the field is a property of the light.
5 · Calibrating the rig
Chapter six
Shooting a roll
Three exposures per frame, in a consistent order, without
moving anything. The app will work out the rest.
You do not have to name anything
Drop the whole folder in. Which three exposures belong to one frame is
worked out from filenames, capture time and shot order — and from the
pictures themselves, because a red-filtered negative measures nothing like a
blue one. DSCF0001.RAF through DSCF0042.RAF
straight off the card is a roll the app can read.
Which band a file is comes from the image alone, and the name is
never trusted for it. A name is typed by hand and has been wrong; under one
narrow band a single colour of the array dominates by a wide margin, and the
largest median names it.
If you would rather make it certain
One folder per channel, or _R, _G,
_B in the file name — the strongest hint
Shot in R, G, B order — capture time is read as well
Neither is required. They only shorten the work the grouper has to do.
Include the flats
Shoot the three bare-gate exposures at the head or the tail of the roll,
with the film out of the holder and the light and camera on the same settings
as the frames. Import them along with everything else.
Do not move the rig mid-roll
Registration is measured and corrected per frame, but it is correcting
small residual drift. If the stand is knocked, the frames before and after
are two different rigs sharing one flat.
6 · Shooting a roll
Chapter seven
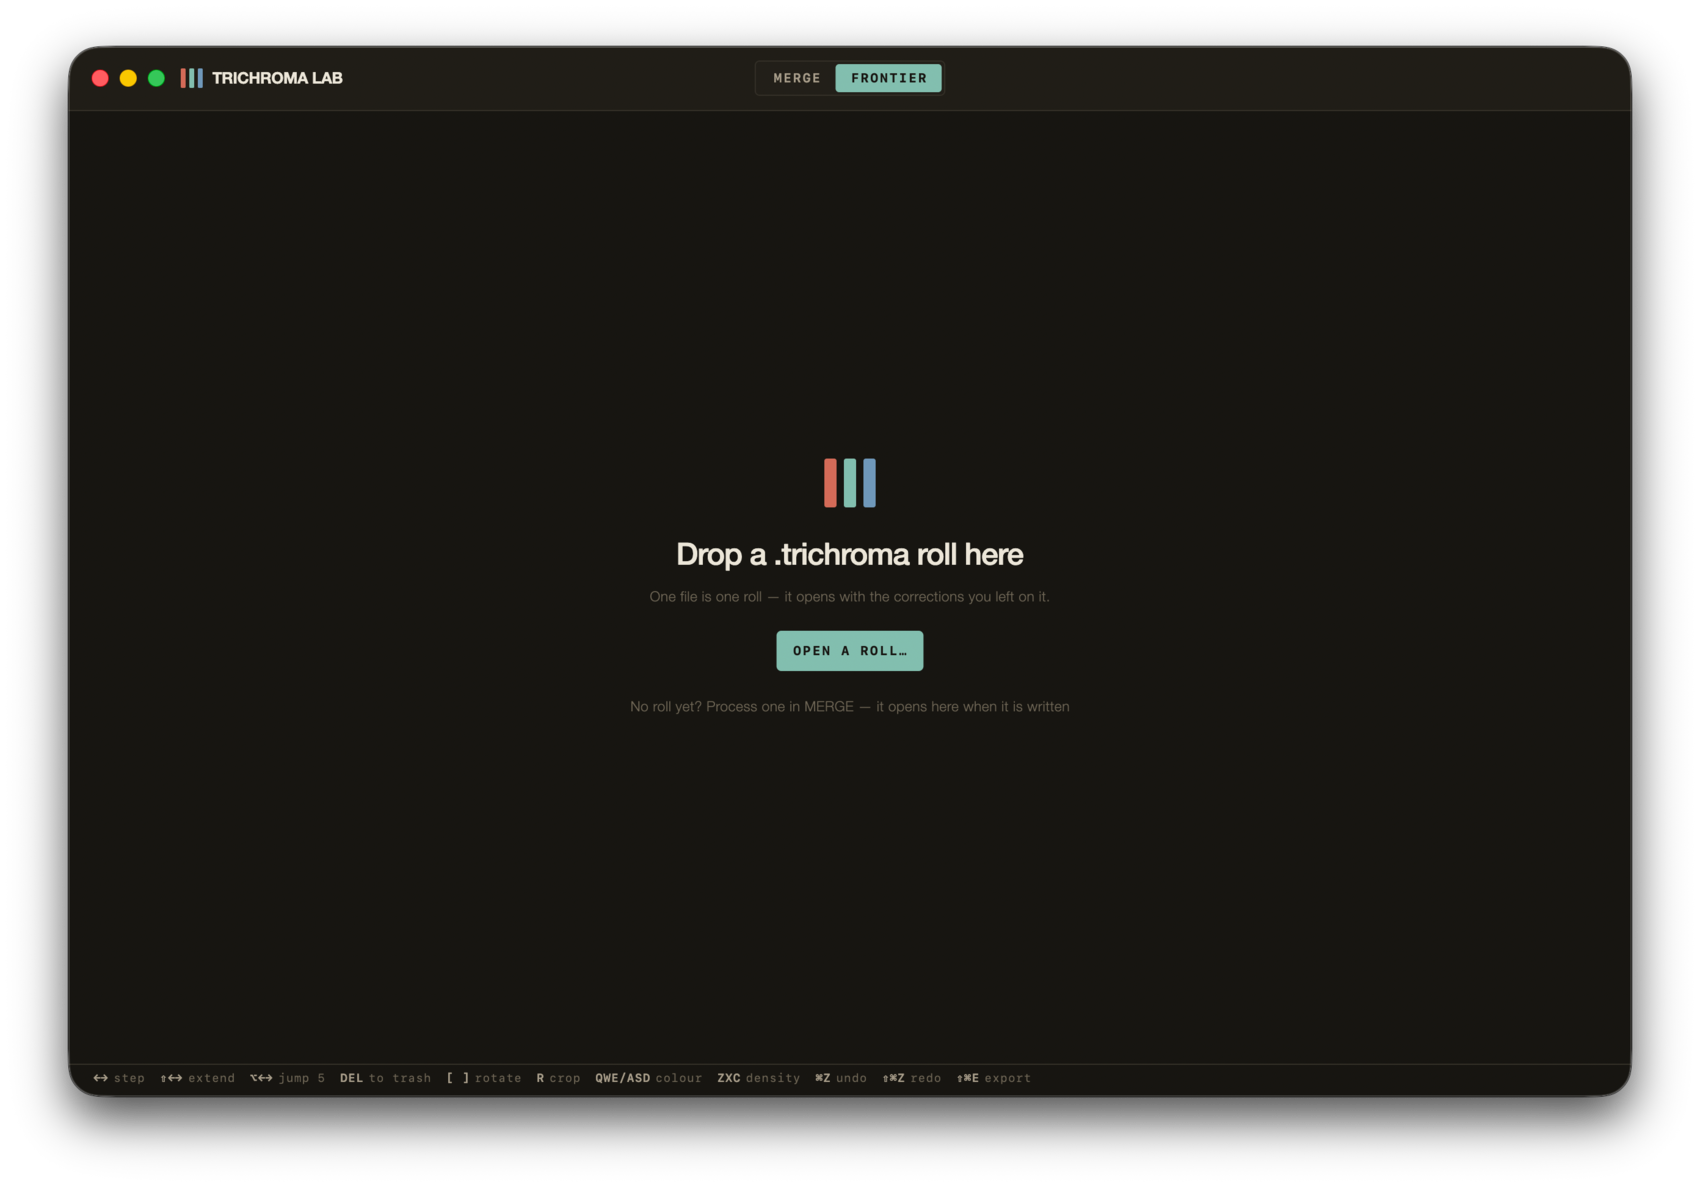
Merge
Drop the raws in. MERGE groups them into frames, lifts out the
flats, and shows you what it decided before anything is processed.
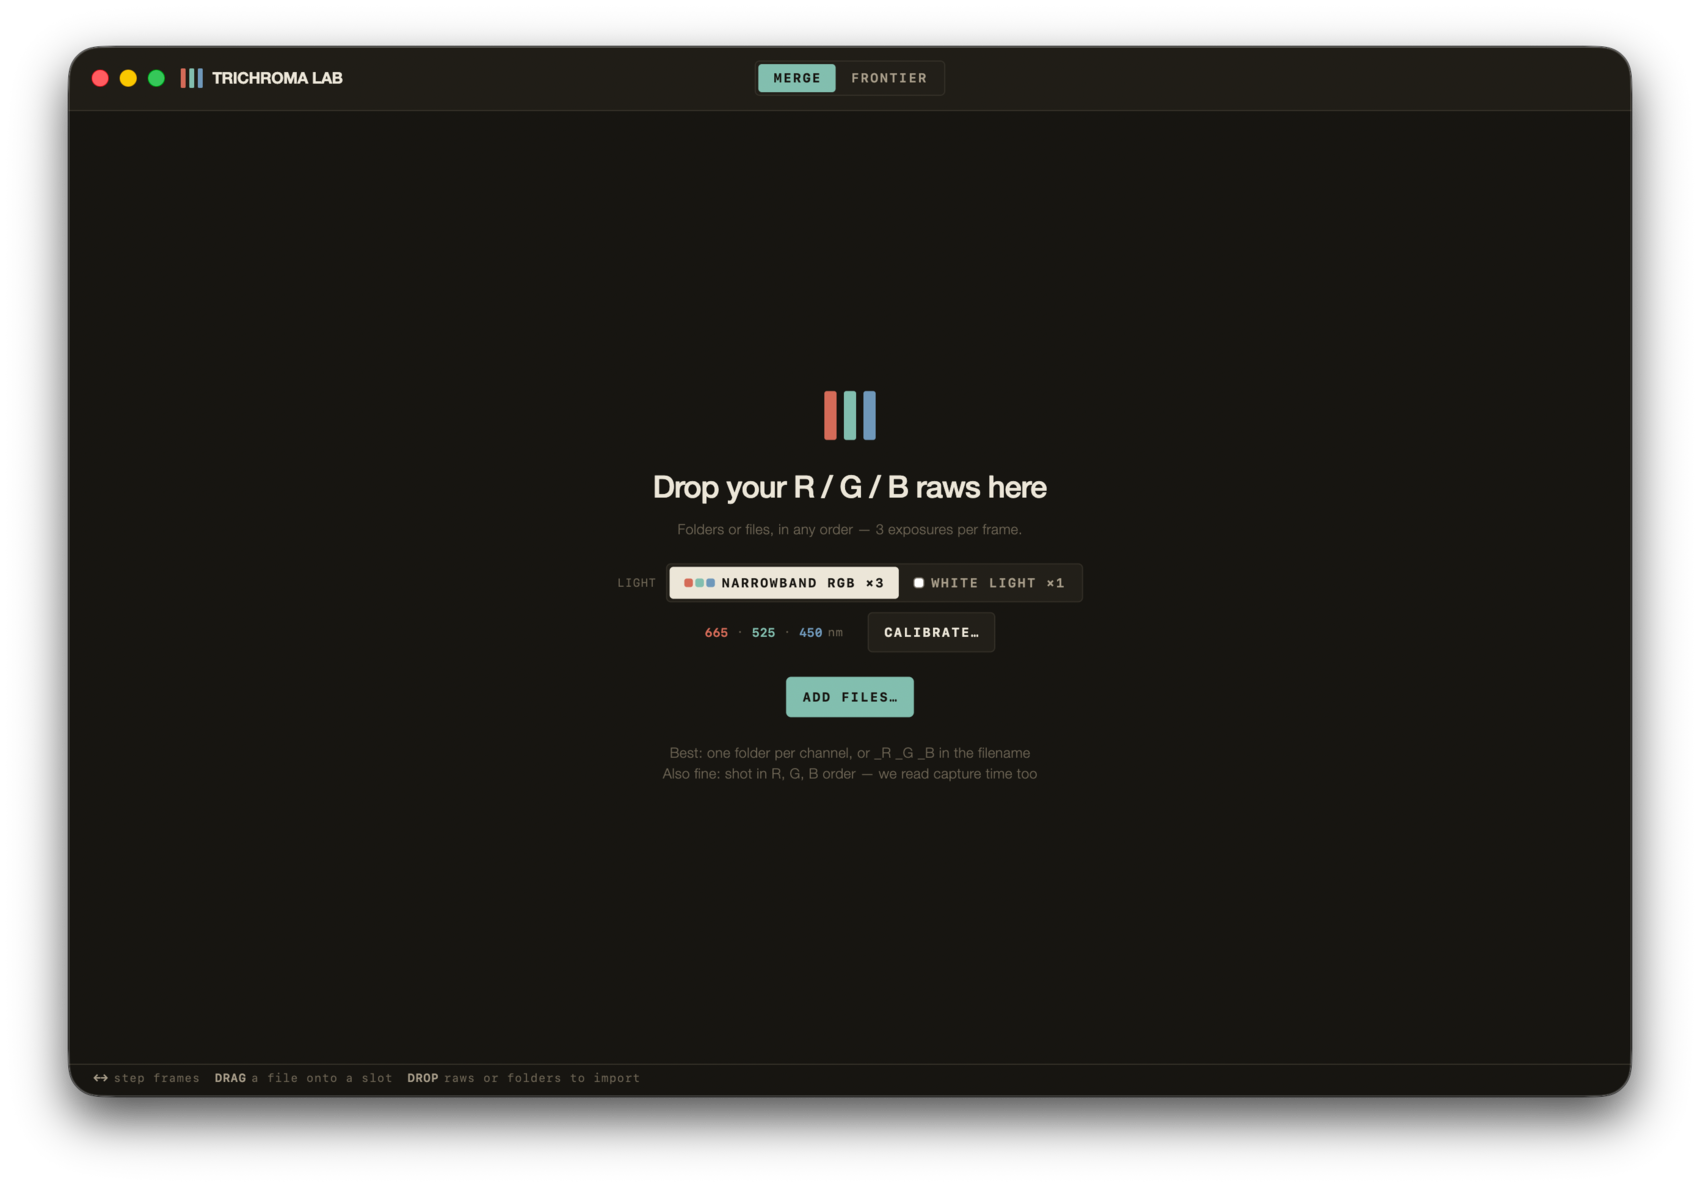
7.1 — the empty state. The light selector here is the one
decision to make before importing: three narrowband exposures per frame, or
one white exposure per frame.
Importing adds to the roll — it does not replace it, so one roll's files can
come in from several folders in several goes. Keep it to one roll of film: the
roll is graded from one base, and another roll's frames pull that base toward a
film neither of them is. Importing copies or moves nothing — the roll's own
copy of the sensor data is made at PROCESS.
7 · Merge
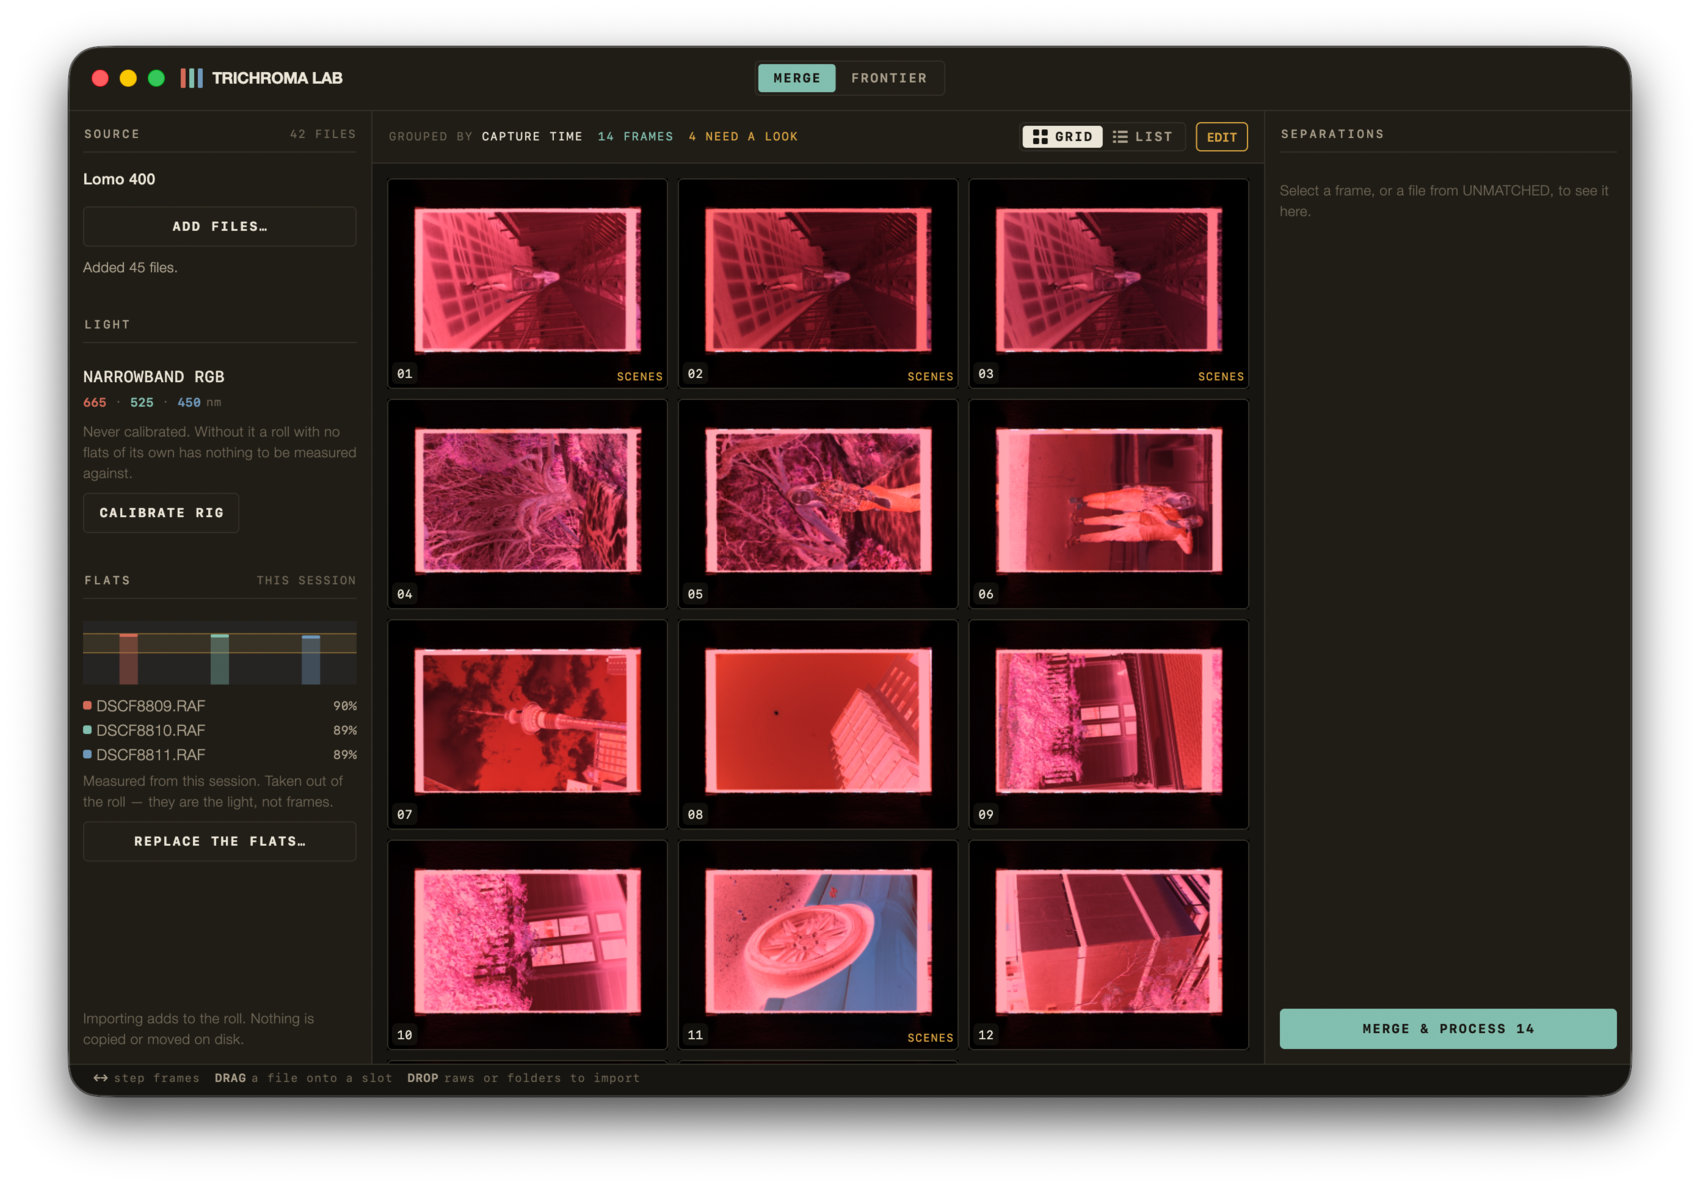
7.2 — forty-five files dropped in, three of them flats.
The flats are lifted out, so the source reads 42 — fourteen frames of
three. Four are flagged as needing a look. The left rail carries the light
and this session's flats; the right rail shows the separations of whichever
frame is selected.
What to check before processing
The frame count. Whatever you dropped in, minus the flats, should
divide by three. In figure 7.2 that is forty-five in, three flats out,
forty-two left, fourteen frames. One frame too many usually means a flat is
still in the roll.
The flats panel. It should name three files and show their
levels — 90, 89 and 89 % in figure 7.2. Note that the rig above it says
never calibrated and the roll is still fine: these flats were shot
beside it, and a session flat outranks a rig one anyway.
The separations. Click a frame and look at its three exposures.
They should be recognisably the same picture in three different densities.
Anything unmatched. Files the grouper could not place are listed
rather than quietly dropped.
Grouped by capture time
The header says which rule was used. Where filenames carry channel markers
the app prefers those; otherwise it falls back to capture time and shot
order, and confirms each group against the images themselves.
7 · Merge
Chapter eight
The base area
One box, drawn once per holder, that tells the app where the
film is inside the capture — and where to read the roll's own base density.
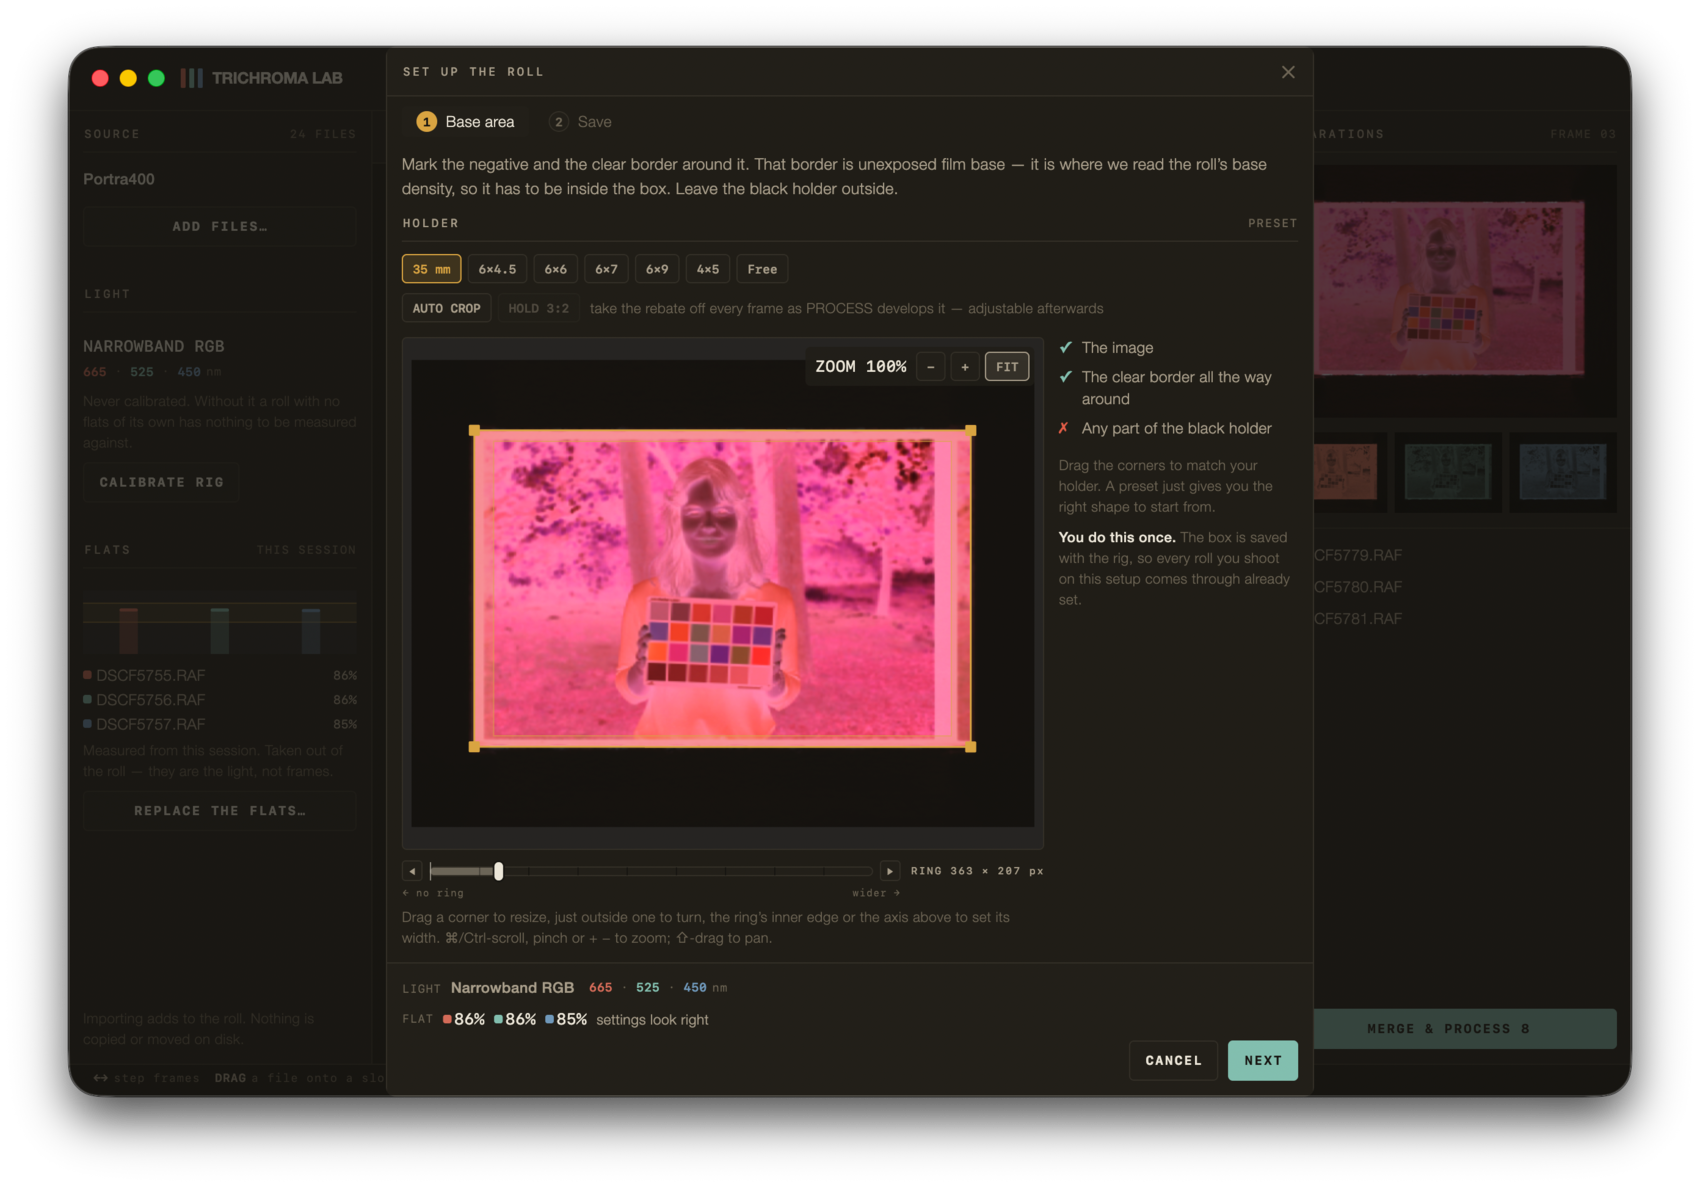
8.1 — the box around the negative and the clear border
around it. The ring between the two is where the base is read.
The instruction on the sheet is the whole chapter in two sentences:
mark the negative and the clear border around it. That border is
unexposed film base — it is where we read the roll's base density, so it has
to be inside the box. Leave the black holder outside.
8 · The base area
The checklist
The image
The clear border all the way around
Any part of the black holder
This one cannot be undone
A sliver of black holder inside the box makes the base read too dense.
The whole roll then grades wrong, and every frame still looks plausible
on its own — so nothing downstream can catch it, and no later
correction recovers it. That is why the cross on that checklist is drawn in the
alarm colour, which this app uses in only two places.
Being generous outward is the dangerous direction. Being generous
inward only samples less base, which costs precision rather than truth — so
when in doubt, pull the box in.
You do this once
The box is saved with the rig, so every roll you shoot on that setup arrives
already set. The holder buttons — 35 mm, 6×4.5, 6×6, 6×7, 6×9, 4×5, Free —
are slots, not shapes: 35 mm means the box I measured for my
35 mm holder, not a 3:2 rectangle. Nothing constrains the
aspect, and each slot remembers the last box you left in it.
8 · The base area
The ring
The ring is the band between the box's edge and the picture — the part that
is read as base. Its width is set as a fraction of the frame, which is why
the sheet also prints it in pixels:
RING 363 × 207 px
Pixels are the one unit that means the same thing on every holder. The
fraction does not: 0.08 on 35 mm is about 1.1 mm of film, while 0.06 on 6×7
is about 1.8 mm. Anybody reasoning in fractions raises the number for the
bigger holder and drives the ring into the picture.
A ring of zero is a real answer, and it is announced
If the ring is closed up to nothing there is no base to read, and the app
says so and offers to put it back. A ring left at zero and remembered in
the rig once refused every frame of a 41-frame roll while reporting
it as a problem with the pixels.
Auto crop, and holding a ratio
AUTO CROP takes the rebate off every frame as the roll is
processed, adjustable afterwards. It decides whether the crop is
applied, not whether it is measured — every frame is
measured either way, which is what makes turning it on later instant.
HOLD 3:2 and its equivalents lock the per-frame crop to the
holder's own ratio. It never applies to the base area itself: the base area
stays whatever you measured for the window, rebate and all, because the ring
is where the base is read.
8 · The base area
Chapter nine
The roll file
A roll is one file. Everything the session decides lives in it,
so the roll can be reopened, moved between machines, and re-rendered from
scratch.
Screenshot withdrawn — it showed an earlier version of this screen.
9.1 — naming the roll. The extension is
.trichroma.
What goes in it
The rig calibration — the station, its response curves and this crop, as
one object
Every frame's D, C, M and Y, its tone and its crop
The sensor data of every frame — a copy of what the roll needs,
not your raw files
The raws you import are never moved or changed, and the roll does not read
them again after PROCESS: it reopens, re-renders and exports from its own
copy. Keep the raws as your archive — processing again starts from them. The
copy keeps at least two bytes for every photosite, whatever the raw's own
compression, so a roll can be as large as the raws it was made from, or
larger; TRIM OUTSIDE BASE AREA, on step 1 of SET UP THE ROLL, keeps only the
base area — the box — and makes a new roll smaller. Everything you export —
TIFF, JPEG, NEGATIVE — is an open format you can take anywhere.
Because the calibration travels inside the roll, a roll opened on another
machine renders identically there. It does not go looking for that machine's
rig.
9 · The roll file
9.2 — and how it comes back. A roll dropped here opens
with the corrections still on it; a roll processed in MERGE opens here by
itself once it is written.
9 · The roll file
Chapter ten
Prescan — what it measures
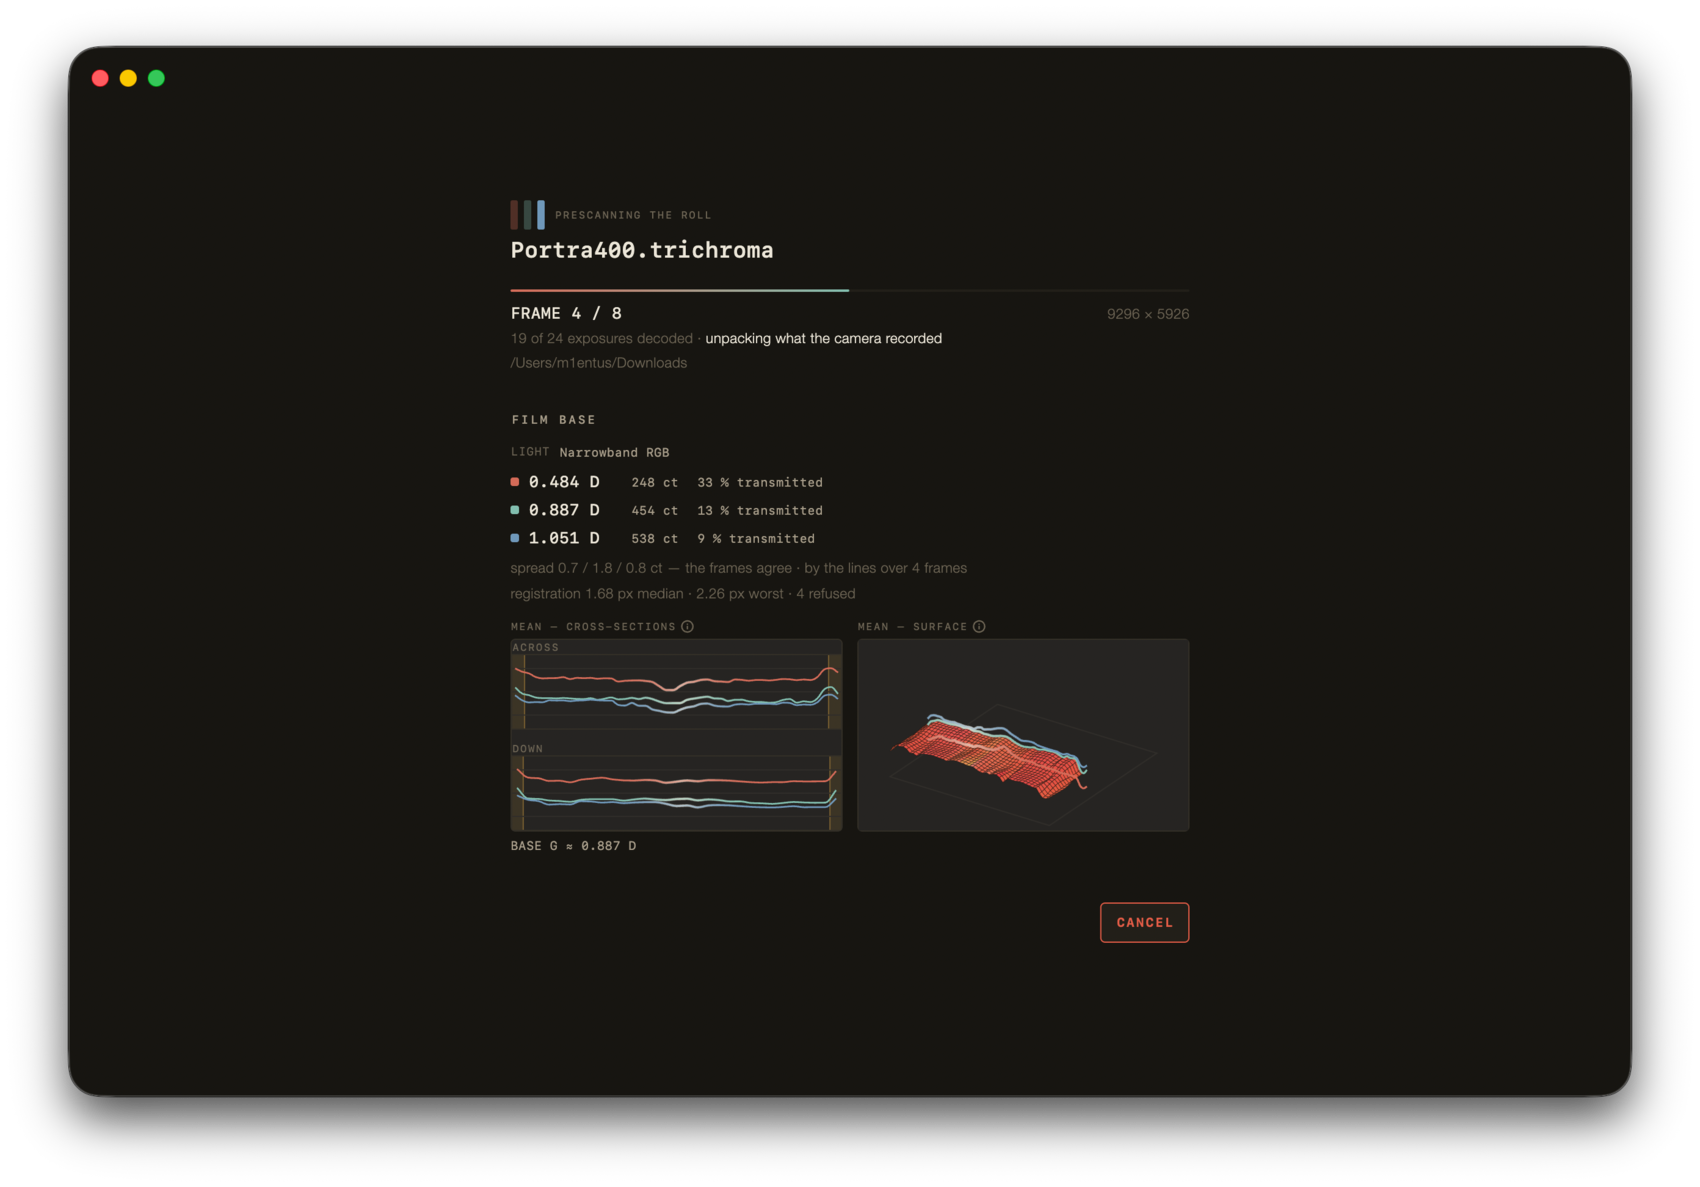
Before a single frame is graded, the roll is measured: its film
base, per channel, and how far the three separations sat from each other.
10.1 — the film base in density per channel, how much the
frames disagreed, the registration, and two views of the light itself.
The film base
Three densities, always in this order and always increasing:
Channel
Density
Transmitted
Red · 665 nm
0.484 D
33 %
Green · 525 nm
0.887 D
13 %
Blue · 455 nm
1.051 D
9 %
That rising order is the orange mask, and the app checks for it: three
densities that are not in mask order are refused, because they cannot be a
colour negative's base.
10 · Prescan
How the base is found
Three ways, tried in a measured order.
Estimator
What it does
The lines
Finds the gaps between negatives and the margin, wherever they happen to cross the crop
The ring
Reads the density in the ring the base area defines
The picture
White-light rolls only
The lines go first, and the reason is that film is advanced by hand. One box
is set per holder and every frame is read through it, but the frame that box
fits at the start of the roll has moved by the end — so the ring reads
whatever happens to lie at its edge. Measured across one roll, the ring
spread 459–497 counts where
the lines spread 13–16.
The ring is the rescue, not the disgrace: at small preview sizes the lines
have too little to work with, and the ring carries the roll. The panel always
says which one owned the reading.
One estimator owns the roll
Never a mean across two. Averaging a good estimator with a poor one produces
a number that belongs to neither, so the app picks one and says so — “by
the lines over 12 frames (2 by the ring, not averaged)”.
The spread is the measurement
Film base is physically constant within a roll. Every difference between
frames is therefore error, not variation — which is why the app reports the
spread and calls the frames agreeing only when every channel is
within 10 counts.
Ten is not a noise floor. It is a price: 20 counts of error costs up to
+2.11 dE, and over-reading costs roughly twice what
under-reading does.
10 · Prescan
Registration
Two estimates per frame — green against red, and blue against red — and the
line reports the median, the worst, and how many were refused:
The shift is measured in fractions of a pixel and resampled rather than
rounded to the nearest whole one. An estimate is refused when the frame has
too little texture to register, when the shift is larger than 2 % of the
width — that is a different picture, not drift — or when the best match is
too poor to trust. A refusal changes nothing: the app leaves the pixels
alone and says why.
Refused is not the same as not applied
Very small shifts are the estimator's own noise, and correcting noise is a
resample for nothing. Very large ones are reported but not applied. Both
still appear in the numbers — the count of refused means something
narrower than “not corrected”.
The two charts
The cross-sections and the surface are two views of your light across the
frame, averaged over the roll's frames. Lines that never flatten out are the
sign worth knowing: they mean the base area is sitting on the picture rather
than on clear film.
10 · Prescan
Chapter eleven
Grading
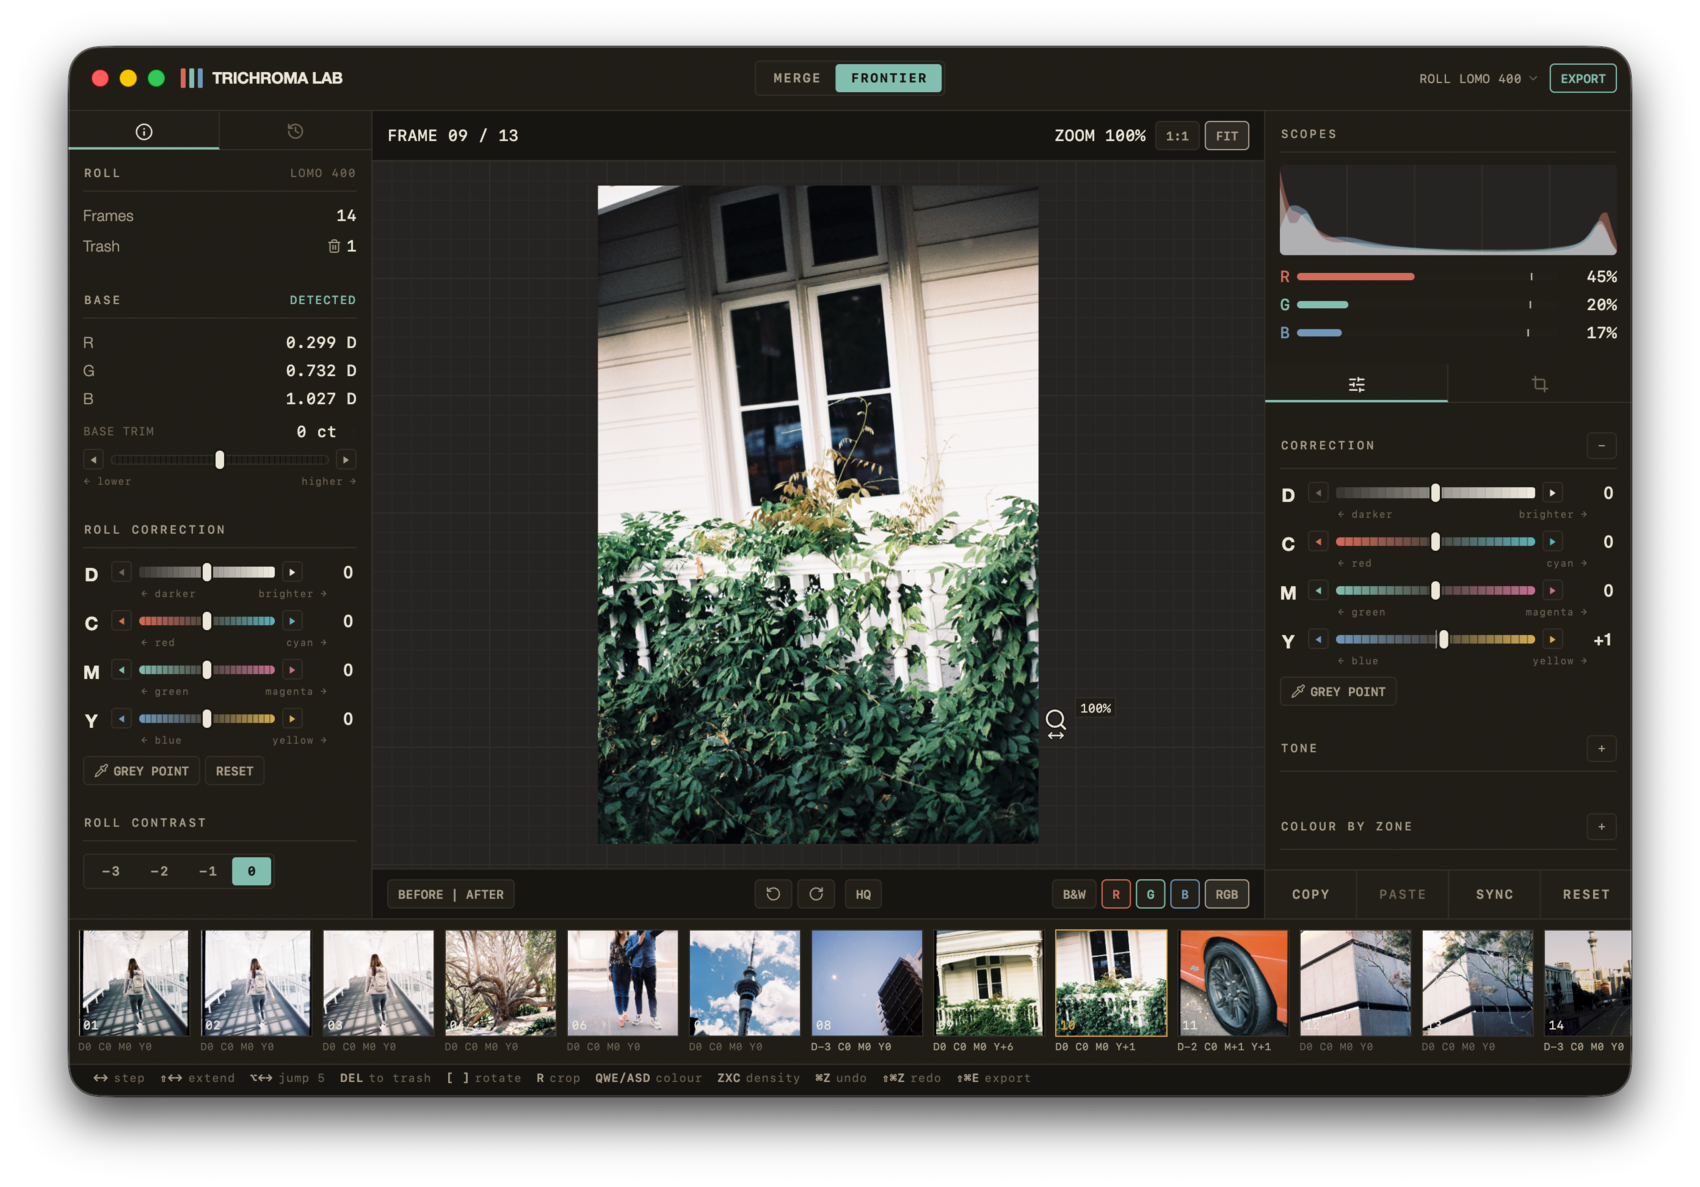
LAB is where the roll is printed. The vocabulary is a
lab's: four axes, applied to the whole roll or to one frame.
11.1 — look at the two panels together. On the left,
ROLL CORRECTION is at zeros; on the right, this frame carries
Y +1 of its own. The filmstrip shows the rest of the roll
disagreeing in the same way — D−3 here, Y+6
there. Every frame renders as its own four numbers plus the
roll's.
The four axes
Axis
Towards −
Towards +
D · density
darker
brighter
C
red
cyan
M
green
magenta
Y
blue
yellow
11 · Grading
+D is brighter, on purpose
The printing convention is deliberately inverted here, because “more
density = darker” reads backwards to everyone who has not stood at a
printer. If you came from one, Settings turns it round — and this is the
only place in the app where a preference changes what a number means. What
is stored in the roll is always the scan way.
Roll correction and frame correction
The same four axes appear twice, and the difference is what they apply to.
The left rail is the whole roll. The right rail is the frame
you are looking at. A frame renders as its own numbers plus the roll's.
Grade the roll first and the frames second. The roll-wide axes are the
ground everything else is judged against, and they render live — nothing is
re-measured when you move them.
Base trim
Base trim is different in kind, and the app treats it differently. It shifts
the measured film base itself, equally on all three channels, in counts —
two counts a step, up to about forty either way.
Because it changes the base, it changes what every law downstream reads, so
it does not take effect as you drag. Hold PREVIEW to see the
frame as it would land; press APPLY to re-render the roll.
It is a neutral shift, not a colour axis — which is what keeps the mask
order a real base has. There is no base trim on a white roll, and none on a
roll whose base was refused.
11 · Grading
Roll contrast
Four positions: −3 −2 −1 0. Zero is the roll as its own laws
print it, which is why there is nothing above zero — the ladder runs from
what the app already prints down to as flat as the profiles go.
The labels are positions, not quantities
−3 is not three of anything. The ends and the densities walk
by different amounts at each step, and no single multiplier describes it.
Pick by eye.
Grey point
The pipette arms the next click on the picture and goes out with it — one
shot, not a mode. It moves C, M and Y only, never D, and it lands on
whichever set of rows it was started from: click it in the left rail and it
moves the roll, click it in the right rail and it moves the frame.
If there is nothing neutral where you clicked, it says no neutral
reading there and changes nothing.
Tone
Seven named looks, shown as live thumbnails of the frame you are on: hover
previews, a press keeps. You pick a look, not a curve.
The two ends of the tone range move independently and their regions do not
overlap, so a combined profile is exactly the sum of the two single-ended
ones. Hard opens the separation — shadows down, highlights up;
soft closes it. Alongside them sit a
HYPERTONE switch and a strength axis.
11 · Grading
BEFORE
Press and hold BEFORE to drop back to neutral. It takes off
this frame's rows, never the roll's — the roll correction and roll
contrast are the ground the frame is being judged against, so stripping them
too would answer a question nobody asked and make every frame look far more
corrected than it is. What BEFORE means is: this frame, before I touched
it.
The same press-and-hold is the base trim's PREVIEW,
deliberately, because it is the same question — what does the other version
look like?
Copy, paste, sync
SYNC gives every other frame on the strip this frame's colour,
tone and image corrections, replacing their own. Crops, turns and the trash
are left alone, and it asks first.
The filmstrip
Each thumbnail carries its own four numbers — D0 C+1 M0 Y0 —
so the state of the whole roll is readable at a glance without selecting
anything. Frames sent to the trash leave the count but stay recoverable; the
header shows the roll's frames and how many are in the trash.
11 · Grading
Chapter twelve
Settings
Almost nothing in here changes what the app measures. It
changes how the app answers your hand — how far one step moves, which way
the density bar points, and how the preview is drawn.
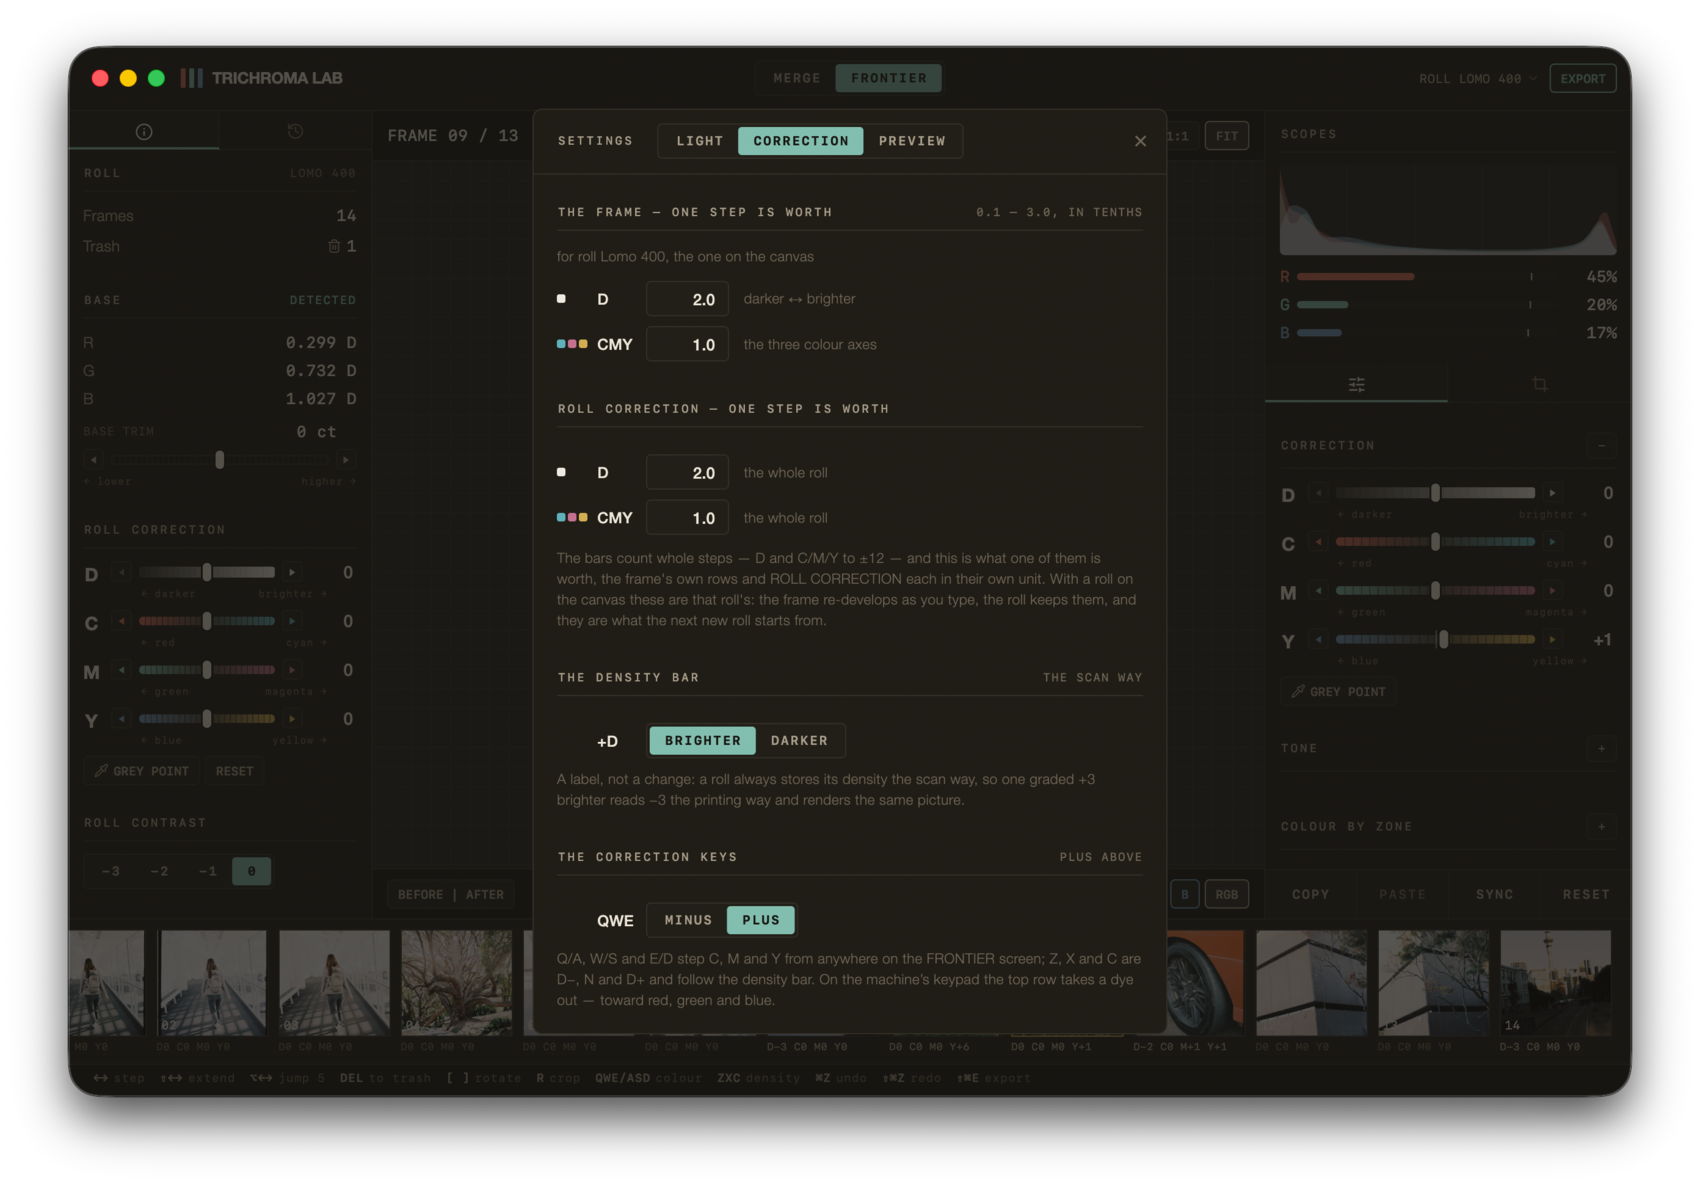
12.1 — the correction tab.
What one step is worth
The bars count whole steps — D and C, M, Y to ±12 — and this is what one of
those steps is worth. The frame's own rows and ROLL CORRECTION
each carry their own unit, adjustable from 0.1 to
3.0 in tenths.
With a roll open these belong to that roll: the frame re-develops as you
type, the roll keeps them, and they are what the next new roll starts from.
12 · Settings
Which way +D points
The choice chapter eleven mentioned lives here: +D can mean
brighter — the default — or darker, the way a printer reads it.
It is a label, not a change
A roll always stores its density the scan way. One frame graded
+3 brighter reads −3 the
printing way and renders the same picture. Nothing about the file changes
when you flip this — only what the panel calls it.
The correction keys
Q/A, W/S and E/D step C, M and Y from anywhere on the LAB screen; Z, X
and C are D−, neutral and D+, and follow whichever way the density bar is
pointing. The setting decides whether the top row of that keypad adds or
subtracts — on a minilab keypad it takes a dye out, which moves the
picture toward red, green and blue.
12 · Settings
The live preview
The canvas can be drawn by the processor or by the graphics card. The
graphics card updates the picture much faster while you adjust it. With
SCANNER, its colours can differ from the file by up to two levels in 255.
The file does not depend on this choice: the export always uses the
processor.
Screenshot withdrawn — it showed an earlier version of this screen.
12.2 — the preview tab.
The colour chain
16-BIT, the default, keeps the fractions the scanner's chain rounds away
at ten bits: smoother deep shadows under a strong push, and TIFFs written
at sixteen bits with about ten and a half real ones. SCANNER writes
eight-bit TIFFs. The picture keeps the scanner's level on either setting.
12 · Settings
Chapter thirteen
Export
Three formats. The shape of that list is an honest statement
about the machine rather than a product decision.
Screenshot withdrawn — it showed an earlier version of this screen.
13.1 — name, range, numbering, format and size.
Format
What it is
NEGATIVE
16-bit linear, no profile — for another converter
TIFF
16-bit sRGB, about ten and a half real bits, profile embedded — 8-bit when the colour chain is SCANNER
JPEG
8-bit sRGB, profile embedded
A TIFF positive is sixteen bits by default. That is not sixteen measured
bits: the colour chain keeps about ten and a half real bits of tone, and an
eight-bit file would round them away. SCANNER — the colour chain on the
PREVIEW tab of SETTINGS — rounds at ten bits and writes eight-bit TIFFs.
COMPRESSION on the export sheet is lossless either way.
13 · Export
The negative carries no profile, on purpose
It is not in a colour space. It is transmittance counts off a sensor with a
filter in front of it, and stamping sRGB on that would tell every converter
downstream to apply a transfer function to numbers that have never had one.
This is the export to take into another converter.
Size is a develop width, not a resize
FULL, 4096, 2048 or a number you
type. The decoder reconstructs straight to the size asked for, so a smaller
export is genuinely cheaper rather than a big one scaled down afterwards. The
custom box is in pixels on the long edge, because a frame on its end
is taller than it is wide.
There is no size row for the negative: the measurement has no size to
choose.
Sharpening will not match the canvas
The sheet says so. Sharpening reaches are absolute pixel counts, so a
full-resolution export sharpens differently from the screen you judged it
on. There is no rescaling rule in the engine, and inventing one would be
making up numbers.
Cancelling
Files already written stay on disk. A cancelled export is a shorter export,
not a failed one — half a folder of TIFFs is half a folder of TIFFs.
13 · Export
Chapter fourteen
Do and do not
Every line below is a mistake that has actually been made on
this bench, with what it cost.
Do not
Because
Let any black holder inside the base-area box
The base reads too dense, the whole roll grades wrong, and every frame still looks plausible on its own
Close the rebate ring to nothing
A ring left at zero and remembered in the rig refused every frame of a 41-frame roll, and blamed the pixels
Split a calibration across two shutter speeds
About 90 counts of error in every density, invisible on screen
Reuse another session's base area
Measured: a roll fifteen counts out on every frame, with nothing downstream able to notice
Drop a second roll onto the one in MERGE
Done once with E-200 on an E-100 roll: the two were graded as one roll, under one flat
Reason about the ring in fractions
The same fraction is a wider ring on a bigger holder, and it walks into the picture. Read the pixel figure
Judge the lamp on a frame instead of the empty gate
A perfectly exposed rig reports too low on any normal negative — the ladder is for bare light
Divide a white roll by a narrowband flat
The base spacings come out wrong in a way nothing downstream can detect
14 · Do and do not
Do
Because
Shoot three flats with every roll
A session flat is the only one that saw the same light the frames did. Three frames, and a whole class of silent error disappears
Type the lamp settings into the app
It is the one number nothing can measure again afterwards
Pull the base-area box inward when unsure
Inward costs precision. Outward costs the truth
Grade the roll before the frames
The roll-wide axes are the ground each frame is judged against
Read the spread, not just the base
Base is constant within a roll, so the disagreement between frames is the error
Re-calibrate when the lamp, lens or aperture changes
A rig flat is right until one of those moves, and silently wrong afterwards
Keep the raws as your archive
The roll reopens, re-renders and exports without them, so moving them costs nothing — but processing again starts from them
The habit that pays for itself
Three bare-gate exposures at the head of every roll. It removes the rig
flat's whole failure mode — being right until something moved — and costs
about ten seconds.
14 · Do and do not
Chapter fifteen
When it refuses
A refusal always carries a sentence. The app is designed so
that a frame arrives either with a measurement or with a reason — never with
a number it does not believe.
What it says
What to do
Not an empty-gate exposure — this looks like a frame
A frame reached a flat well. Take the film out and shoot the gate
Clipped past measuring
Cut the light by about a third and shoot it again
Photosites at the ceiling
Back the light off until nothing touches the top
These were not all shot on the same shutter and ISO
Re-shoot the set on one exposure
Too bright / too dark in one channel
Move that band's setting and try again — the app suggests the next one
Running off the film
The base area reaches past the film's edge. Pull the box in
The base area is on the holder, or the film is fogged or dense
Both causes are named because both happen. Check the box first, then consider the film
15 · When it refuses
A whole roll refused
If every frame refuses as denser than any film base, and the readings agree
with each other, the film itself is probably fogged. The app recognises this:
when the readings are consistent, still in mask order, and only past the
window rather than absurd, it refuses the base outright and grades the roll
without one.
That is not a workaround. It is what a lab scanner does with the same film,
measured against its own logs. The panel says so: refused like the
scanner · graded without a base. Base trim is withdrawn on such a roll,
because the laws read nothing there and a control that did nothing would
teach you that the panel lies.
When the numbers agree and are still wrong
Agreement across frames cannot tell fog apart from three other things that
are also constant on every frame: mask penumbra inside the crop, holder in
the corners of a strip that is not quite square, or a roll of one flat dense
scene. No cheap statistic separates them.
What protects you there is the base area itself, drawn where the light
actually is, and the cross-section chart on the prescan screen — lines that
never flatten mean the box is on the picture.
If something looks wrong and nothing is refused
Check the base area before anything else. It is the one input whose errors
are invisible per frame and fatal per roll.